.jpg&blockId=1b87074d-017e-8069-9667-d5678d39e51d)

Situation
이에 라이브러리에 의존하지 않고 비즈니스 로직을 짤 수 있는 구조에 대해 고민하게 되었고, 이는 근본적으로 도메인 비즈니스 로직이 외부 프레임워크에 의존적이기 때문에 생기는 문제점임을 깨달았습니다.
이에 외부 프레임워크가 비즈니스 로직에 의존하게 만드는 Hexagonal Architecture를 접하고 공부하였습니다.
이번에는 기존에 제가 맡았던 경로 최적화 알고리즘 API 제공이라는 Task에서 벗어나서, 실제 배달 기사님들이 사용할 경로 최적화 웹앱 백엔드를 새로 만드는 과정에 참여하였습니다. 그리고 함께 업무를 진행하는 시니어분께서 만들어놓으신 Hexagonal Architecture 기반의 구조의 API를 완성하고, 더 나아가 OTL에 Hexagonal Architecture를 적용하는 여정에 대해 말해보고자 합니다.
Task
1.
Hexagonal Architecture 기반의 백엔드 서버 API 구현하기
2.
OTL 서비스를 Hexagonal Architecture로 구조 개편
Action
Learning


사실 한 동안 이런 클린 아키텍처는 구현이 불가능하다고 생각했습니다. 외부에서 안쪽으로 들어오더라도, 안쪽에서 DB, 웹으로 나가는 영역이 있으니까요. 하지만 이런 layer들이 interface로 느슨하게 연결된다면, 그리고 그 interface가 맨 안쪽 도메인 영역에 해당한다면 맞는 말일 것입니다.
제가 이 때까지 사용해왔던 Layered Architecture는 다음과 같은 구조입니다.
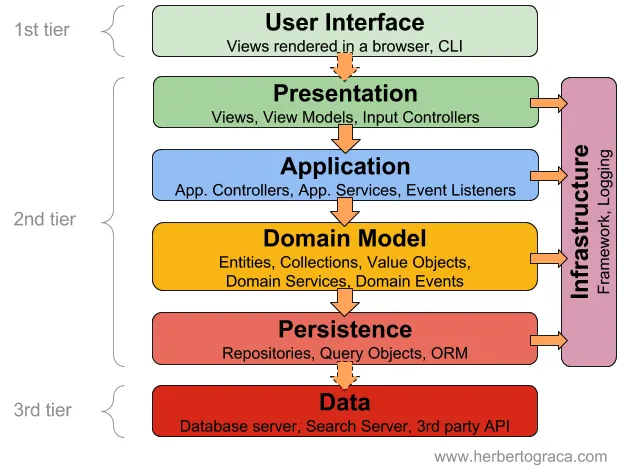
이 구조에서 방향은 User Interface에서 Data로 향합니다. Clean Architecture는 이 양끝단을 Domain Model에서 가장 먼 지점으로 바라보고 동그랗게 표현한 것에 불과합니다. 그렇기에 Clean Architecture를 구현하는 Hexagonal Architecture를 그려보자면 다음과 같습니다.
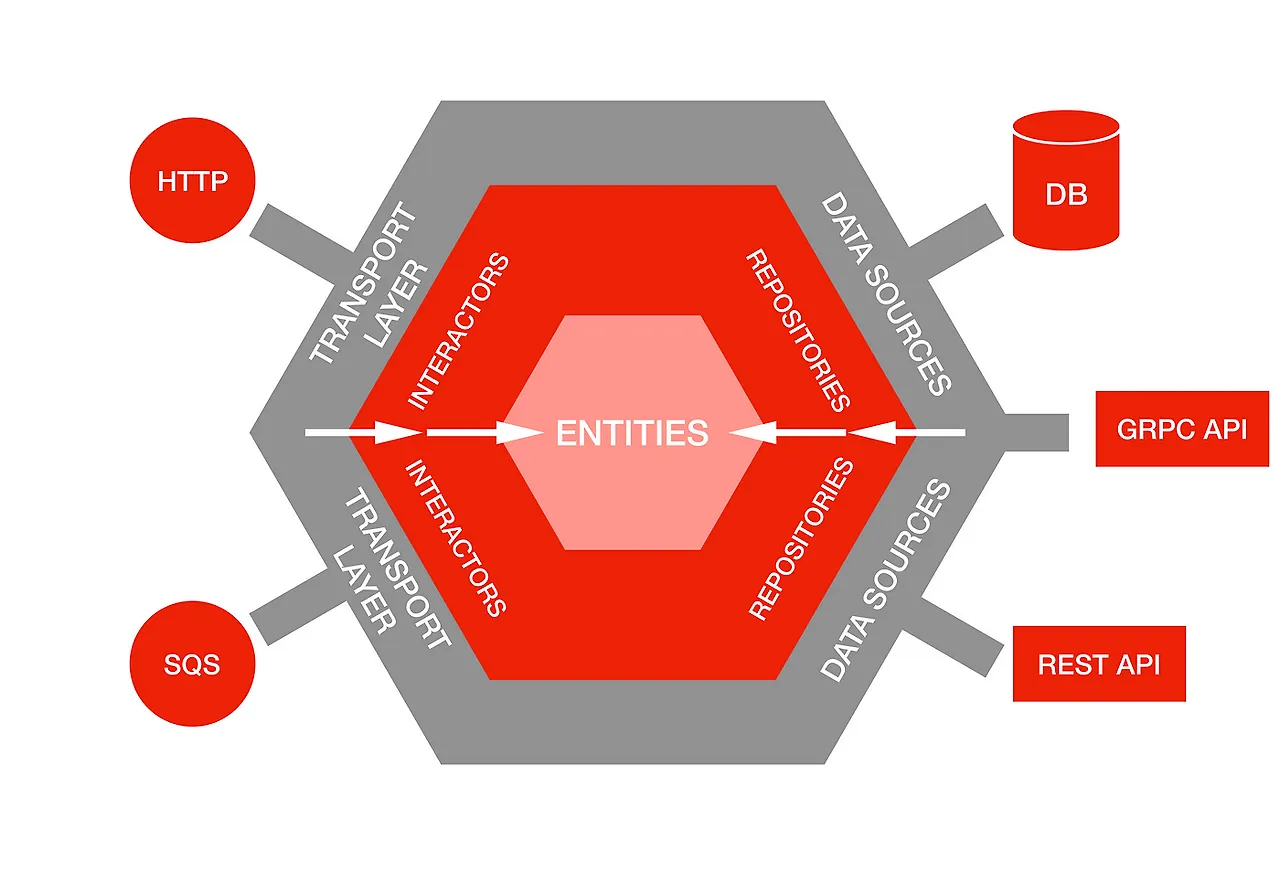
맨 안쪽 비즈니스 로직을 제외한 코드는 비즈니스 로직 간에만 의존하는 것입니다. 그리고 비즈니스 로직이 외부와의 연동이 필요하다고 하더라도, 이는 interface로 비즈니스 로직 내에 정의를 해놓고, 외부 요소들 (DB, API 등)이 그 interface를 구현하는 방식입니다.
여러 블로그를 보더라도 다양한 용어들로 정리가 되어있지만, 제 나름의 방식으로 정리를 해보자면
•
Domain Layer
◦
Entity
▪
우리가 만든 가상의 세계, Domain에서 뛰어노는 Class, Object 입니다. 이는 순수한 Java 또는 TypeScript로 구현되어있습니다.
◦
UseCase
▪
Domain Layer의 Entity들이 어떤 행동을 하는지에 관해 적어놓은 것들입니다.
▪
실제로 하나의 비즈니스 로직에 해당하며, 이 UseCase들은 Service라는 클래스로 구현이 됩니다.
◦
Port
▪
Domain Layer가 바깥과 소통하는 모든 인터페이스입니다. 이 인터페이스들은 실제로 Serivce 클래스에서 사용하게 됩니다.
▪
뿐만 아니라 다른 도메인과의 소통을 위해 사용되기도 하는데, 예를 들어 B가 A의 함수를 사용하고 싶을 때, B의 usecase에서 A 포트를 import하는 식으로 사용가능합니다.
•
외부 세계
◦
Adapter
▪
Domain Layer에서 외부와 소통하는 Port를 구현한 클래스 입니다.
이를 통해 얻을 수 있는 장점은 다음과 같은데요.
1.
비즈니스 로직을 견고하게 유지할 수 있습니다. 모든 비즈니스 로직이 순수한 자바/TS로만 이루어져있기 때문에, 다른 프레임워크 라이브러리에 의존하지 않습니다.
2.
이에 따라 비즈니스로직 외의 다른 Adapter의 교체가 쉬워집니다. 데이터베이스를 MySQL에서 Postgresql로 바꾼다던가, 아니면 ORM을 Prisma에서 Sequelize로 바꾸던가 하는 식으로 말이죠.
3.
추가적으로 테스트가 용이해집니다. 모든 비즈니스 로직이 순수한 코드로만 이루어지기에 외부 라이브러리나 API는 비즈니스 로직에서 드러내는 Interface만을 Mocking 하면 됩니다.
Result
회사 코드는 보여드리기 어려우니, OTL에 이것을 적용했던 사례를 말씀드리고자 합니다.
저희는 알림 기능을 구현하는데 Hexagonal Architecture를 사용하였는데요. 우선 package는 다음처럼 구성되었습니다.
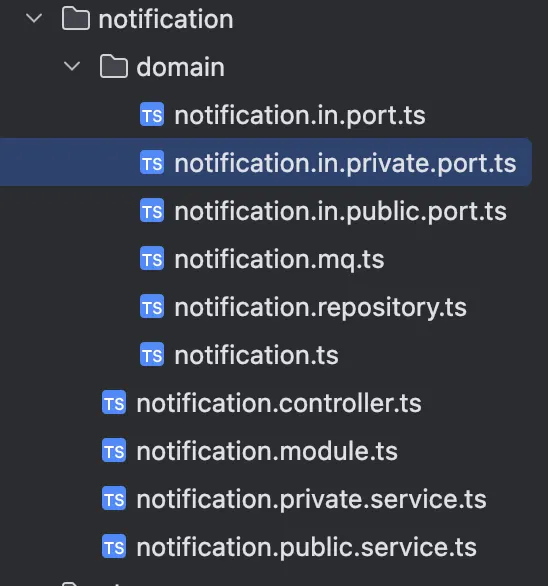
하나씩 말해보자면,
•
notification.in.private.port
◦
notification이라는 모듈을 경계로 바라보면, 이 경계 내부에서만 사용되는 port 입니다.
export interface NotificationInPrivatePort {
// 알림 수신 동의 여부 변경
changeNotificationPermission(userId: number, notificationName: string, Active: boolean): Promise<UserNotification>
readNotification(userId: number, requestId: number): Promise<FCMNotificationRequest>
createNotification(name: string, description: string, agreementType: AgreementType): Promise<Notification>
updateNotification(id: number, name: string, description: string, agreementType: AgreementType): Promise<Notification>
deleteNotification(id: number): Promise<void>
getAllNotification(): Promise<Notification[]>
getNotificationByName(name: string): Promise<Notification>
}
TypeScript
복사
•
notification.in,public.port
◦
notification이라는 모듈을 경계로 했을 때, 경계 외부에서도 사용될 수 있는 port 입니다.
export interface NotificationInPublicPort {
// 알림 전송
sendNotification(
to: string,
title: string,
body: string,
metadata: { userId: number, scheduleAt: Date, notificationName: string },
): Promise<NotificationRequest>
// 모두에게 알림 전송
sendNotificationToAll(title: string, body: string): Promise<NotificationRequest[]>
// 알림 전송 가져오기
getNotificationRequest(uuid: string): Promise<NotificationRequest>
// 알림 전송 여부 확인
checkNotificationCompleted(uuid: string): Promise<NotificationRequest | null>
// 알림 수신 동의 여부 & 약관 동의
checkNotificationPermission(userId: number, notificationType: string): Promise<boolean>
getNotification(name: string): Promise<Notification | null>
}
TypeScript
복사
•
notification.in.port
◦
이 두 개를 모두 상속 받은 interface 입니다.
export const NOTIFICATION_IN_PORT = Symbol('NotificationInPort')
export const NOTIFICATION_IN_PUBLIC_PORT = Symbol('NotificationInPublicPort')
export const NOTIFICATION_IN_PRIVATE_PORT = Symbol('NotificationInPrivatePort')
export interface NotificationInPort extends NotificationInPrivatePort, NotificationInPublicPort {}
TypeScript
복사
•
notification.mq.ts
◦
out.port에 해당하는 것으로 Message Queue를 추상화한 것입니다.
export const NOTIFICATION_MQ = Symbol('NOTIFICATION_MQ')
export interface NotificationMq {
publishNotification(request: FCMNotificationRequest): Promise<boolean>
}
TypeScript
복사
•
notification.repository
◦
out.port 에 해당하는 것으로 Database를 추상화한 것입니다.
export const NOTIFICATION_REPOSITORY = Symbol('NOTIFICATION_REPOSITORY')
export interface NotificationRepository {
// get All Notification
getAllNotification(): Promise<Notification[]>
// get Notification By Type
getNotification(name: string): Promise<Notification>
// get by Id
findById(id: number): Promise<UserNotification | null>
// get by userId
findByUserId(userId: number): Promise<UserNotification[] | null>
// get by userId and notificationType
findByUserIdAndType(userId: number, name: string): Promise<UserNotification | null>
// bulk update
updateMany(notifications: UserNotification[]): Promise<UserNotification[]>
// bulk create
createMany(notifications: UserNotificationCreate[]): Promise<UserNotification[]>
// create and update
save(notification: UserNotificationCreate): Promise<UserNotification>
save(notification: UserNotification): Promise<UserNotification>
save(notification: UserNotificationCreate | UserNotification): Promise<UserNotification>
// upsert
upsert(notification: UserNotificationCreate): Promise<UserNotification>
upsertMany(notifications: UserNotificationCreate[]): Promise<UserNotification[]>
// get notificationRequest with requestID(uuid)
getNotificationRequest(uuid: string): Promise<FCMNotificationRequest | null>
getNotificationRequestById(requestId: number): Promise<FCMNotificationRequest>
// create and update
saveRequest(notification: NotificationRequestCreate): Promise<FCMNotificationRequest>
saveRequest(notification: FCMNotificationRequest): Promise<FCMNotificationRequest>
saveRequest(notification: NotificationRequestCreate | FCMNotificationRequest): Promise<FCMNotificationRequest>
createNotification(notification: Notification): Promise<Notification>
deleteNotification(id: number): Promise<void>
updateNotification(notification: Notification): Promise<Notification>
}
TypeScript
복사
•
notification.ts
◦
notification이라는 도메인에서 사용할 Entity의 집합입니다.
import { AgreementType } from '@otl/common/enum/agreement'
export class Notification {
public static templatePath: string = 'notification'
id!: number
name!: string
description!: string
agreementType!: AgreementType
}
export class UserNotification {
id!: number
userId!: number
notificationName!: string
active!: boolean
}
export class NotificationRequest {
id!: number | null
notificationName!: string
userId!: number
content!: { title: string, body: string }
requestId!: string
scheduleAt!: Date
isCompleted!: boolean
isRead!: boolean
}
export class FCMNotificationRequest extends NotificationRequest {
fcmId?: string
deviceToken!: string
}
export class EmailNotificationRequest extends NotificationRequest {
email!: string
}
export type UserNotificationCreate = Omit<UserNotification, 'id'>
export type NotificationRequestCreate = Omit<NotificationRequest, 'id'>
export function isFCMRequest(
req: NotificationRequestCreate | FCMNotificationRequest | EmailNotificationRequest,
): req is FCMNotificationRequest {
return 'deviceToken' in req
}
export function isEmailRequest(
req: NotificationRequestCreate | FCMNotificationRequest | EmailNotificationRequest,
): req is EmailNotificationRequest {
return 'email' in req
}
TypeScript
복사
그리고 port의 구체적인 구현체는 다음과 같습니다.
•
private.port.ts → private.service.ts
•
public.port.ts → public.service.ts
•
repository → prisma/NotificationPrismaRepository
•
mq → rabbitmq/notificationFCMPublisher
이 중 notificationFCMPublisher 만 보여드리자면, 다음처럼 NotificationMq를 구현하는 식입니다.
@Injectable()
export class NotificationFcmPublisher implements NotificationMq, NotificationConsumerMQ {
constructor(private readonly amqpConnection: AmqpConnection) {}
async publishNotification(request: FCMNotificationRequest): Promise<boolean> {
const exchange = settings().getRabbitMQConfig().exchangeConfig.exchangeMap[ExchangeNames.NOTIFICATIONS]
const routingKey = settings().getRabbitMQConfig().queueConfig[QueueNames.NOTI_FCM].routingKey as string
return await this.amqpConnection.publish(exchange.name, routingKey, request)
}
async publishInfoNotification(request: FCMNotificationRequest): Promise<boolean> {
const exchange = settings().getRabbitMQConfig().exchangeConfig.exchangeMap[ExchangeNames.NOTIFICATIONS]
const routingKey = settings().getRabbitMQConfig().queueConfig[QueueNames.NOTI_INFO_FCM].routingKey as string
return await this.amqpConnection.publish(exchange.name, routingKey, request)
}
async publishAdNotification(request: FCMNotificationRequest): Promise<boolean> {
const exchange = settings().getRabbitMQConfig().exchangeConfig.exchangeMap[ExchangeNames.NOTIFICATIONS]
const routingKey = settings().getRabbitMQConfig().queueConfig[QueueNames.NOTI_AD_FCM].routingKey as string
return await this.amqpConnection.publish(exchange.name, routingKey, request)
}
async publishNightAdNotification(request: FCMNotificationRequest): Promise<boolean> {
const exchange = settings().getRabbitMQConfig().exchangeConfig.exchangeMap[ExchangeNames.NOTIFICATIONS]
const routingKey = settings().getRabbitMQConfig().queueConfig[QueueNames.NOTI_NIGHT_AD_FCM].routingKey as string
return await this.amqpConnection.publish(exchange.name, routingKey, request)
}
}
TypeScript
복사
이 구현이 위에서 설명한 Hexagonal Architecture를 엄격하게 따르지는 않습니다. 특히 HttpAdapter인 Controller 부분이 사실 in.port를 구현하고, 현재 구현되어있는 in.port는 사실 usecase에 가까운 설정입니다.
다만 이런 시스템을 선택한데에는 다음과 같은 이유가 있습니다.
•
Controller만을 고립시킨 테스트가 필요할까?
◦
만약 grpc나 graphql 같은 프로토콜을 갑자기 도입하지 않는한 Controller 테스트는 필요 하지 않다는 의견입니다. 왜냐하면 Validation 테스트는 따로 해도 되기 때문이며 그 외로 Controller를 테스트하는 경우는 E2E 테스트이기 때문입니다.
•
Controller 추상화
◦
Hexagonal Architecture의 추상화는 도메인 모델을 제외한 입출력의 추상화입니다.
◦
Controller의 추상화는 네트워크 프로토콜이라고 볼 수 있습니다.
◦
이 부분까지 추상화하기에는 공수가 많이 들고, 조직의 이탈률이 높은 동아리라는 특성 상 관리되지 않을 가능성이 더 크다고 생각했습니다.
◦
공수를 들여 구현한다고 하더라도, 테스트를 함에 있어서 손해를 보는 부분이 없었기에 Controller 추상화는 따로 하지 않았습니다.
Reflection
•
Test Code
이 구조로 전환하면서 레포지토리에 첫 Test Code를 작성하게 되었습니다.
아래는 Notification 작업을 하면서 정보 수신 동의를 받는 부분이 필요했는데 이와 관련된 테스트 코드입니다. 특히 테스트 코드 작성이 굉장히 수월해진 것을 느낄 수 있었습니다. Repository를 Mocking 하는데 있어서 TypeScript 코드로 짤 수가 있었고, DB를 띄우지 않아도 되었기에 테스트 실행에 확실히 가벼움이 느껴졌습니다.
이전에 E-room 작업 시에나 클라썸에 있을 때에도 테스트 코드를 작성한 경험이 있는데, 그 때는 굉장히 불편했습니다. 불편했던 이유가 바로 Concrete Class에 의존하는 것 때문에 Mocking이 쉽지 않다는 것이었는데, 굉장히 간편해져서 좋았습니다.
작성한 테스트 코드
이에 따라 Hexagonal로 전환한 이후 테스트 코드를 점차 늘려가면 좋을 것 같았습니다.
•
Microservice로의 분리
뿐만 아니라, 이렇게 도메인 모듈을 port로 명확하게 분리하고 나서는 적당한 사이즈로 모든 패키지를 마이크로 서비스로 분리하기도 쉬워졌습니다.
제가 생각했을 때, 마이크로 서비스로 분리하게 된다면 2가지 고려할 점이 존재했습니다.
첫째는 웹과의 소통은 현재처럼 Http로 하지만, 다른 모듈들간에는 grpc로 소통한다는 것입니다. 이 때 public.port에 정의된 함수들을 grpc 형식으로만 정의하면 쉽게 분리가 가능할 것 같았습니다.
둘째는 기존에는 prismaService를 inject 받는 repository가 존재했고 모든 클래스가 이를 다시 inject 받는 구조였습니다. 그렇기에 각각의 모듈은 비록 의존성이 없더라도 모두 Concrete한 repository에 의존하고 있었기에 분리가 쉽지 않았습니다. 하지만 Hexagonal을 도입함으로써, Prisma와 비즈니스 로직 간에 느슨하게 결합을 이루게 되었고, Prisma 모듈을 밖으로 뺄 수 있을 뿐더러, 다른 ORM으로 쉽게 교체도 가능해졌습니다. 추가적으로 모듈 간에 의존성이 존재하는 경우에도 public.port를 통해 소통하기 때문에 같이 하나의 모듈로 묶을지 아니면 분리할지를 쉽게 결정할 수 있게 되었습니다. 따라서 현재 구조에서 쉬울지,어려울지 정확히 알기는 어렵지만 마이크로 서비스로 분리할 수 있는 가능성을 보게 되었습니다.
마이크로 서비스로 분리하게 되면 얻게 되는 가장 큰 이점은 스케일 아웃입니다. 저희 OTL의 각 기능 중에서도 특히 API 요청량이 많은 영역들이 있는데요. 내 정보 / 과목 검색 등은 많이 오는 반면, 졸업 플래너는 상대적으로 적습니다. 트래픽에 맞게 적절히 서버를 스케일 아웃을 할 수 있기 때문에 이런 여정은 꼭 필요한 부분이라 생각합니다.
•
infrastructure 최적화
인프라스트럭쳐 선택에서 자유롭게 되었습니다. 예를 들어서 이제 여러 개의 ORM을 성능 최적화를 위해 구현할 수 있게 되었습니다. Prisma는 느리기로 유명합니다. 특정한 부분에서는 drizzle을 쓸 수도 있을 것입니다.