.jpg&blockId=1b87074d-017e-8069-9667-d5678d39e51d)

Situation
전역 가드 설정
NestJS에서는 글로벌 가드를 설정하려면 아래처럼 2가지 방법이 있습니다. 첫 번째는 main.ts 파일에서 설정하는 것, 두 번째는 AppModule에서 설정하는 법 입니다.
•
main.ts 설정 법
const app = await NestFactory.create(AppModule);
app.useGlobalGuards(new RolesGuard());
TypeScript
복사
해당 방법은 dependency injection을 지원하지 않습니다. 이를 사용하려면 2번 방법을 사용해야합니다.
•
AppModule에서 선언적으로 설정하기
import { Module } from '@nestjs/common';
import { APP_GUARD } from '@nestjs/core';
@Module({
providers: [
{
provide: APP_GUARD,
useClass: RolesGuard,
},
],
})
export class AppModule {}
TypeScript
복사
하지만 이 방법은 결정적으로 여러 Guard에 대한 순서를 보장하지 못했습니다. 왜냐하면 provide라고 하는 것으로 Injectable 토큰을 사용하고 있기 때문입니다.
NestJS로 전역 가드 순서 지정하기
그렇다면 DI를 지원받으면서 순서를 지정하려면 어떻게 할까요? 다음과 같이 하면 됩니다.
import { UseGuards } from '@nestjs/common';
import { AuthGuard } from './auth.guard';
import { RolesGuard } from './roles.guard';
@Controller('cats')
@UseGuards(AuthGuard, RolesGuard)
export class CatsController {
@Get()
findAll() {
return 'This action returns all cats';
}
}
TypeScript
복사
볼 수 있듯 모든 클래스 API를 대상으로 UseGuards() 안에 저렇게 순서대로 입력해줘야합니다. 이는 반복적인 작업을 유발합니다.
동적인 구성
저희 인증 로직에서 요구되는 기능은 바로 ‘환경에 따른 동적 구성’이었습니다. 왜냐하면 스팍스 SSO를 통해 사용자 식별을 진행하였기에 Dev 환경에서 테스트를 하려면 본인의 SSO 계정만을 가지고 테스트를 할 수 있었습니다. 이는 생각보다 큰 불편함이었고, 다양한 user를 이용해서 테스트를 할 수 있으려면 데이터베이스 내의 sid나 학번만을 가지고도 인증을 통과할 수 있어야했습니다. 이를 위해선 Prod환경과 Dev 환경에 배포되는 인증 방식이 달라야합니다.
따라서 이를 위해선 bootstrap.ts 파일에서 if-else 문으로 제어해주거나 AppModule 자체를 Dynamic-module처럼 구성해야합니다. 하지만 전자는 DI를 지원하지 않고 후자는 다른 인프라스트럭쳐 (eg. Prisma)면 모를까 AppModule을 한다는 것은 깔끔해보이지 않았습니다.
Passport를 이용한 JWT 인증의 한계
JWT 인증의 경우 다음과 같이 passport 를 사용하여 처리하는 경우가 많습니다.
import { Controller, Get, Request, Post, UseGuards } from '@nestjs/common';
import { JwtAuthGuard } from './auth/jwt-auth.guard';
import { LocalAuthGuard } from './auth/local-auth.guard';
import { AuthService } from './auth/auth.service';
@Controller()
export class AppController {
constructor(private authService: AuthService) {}
@UseGuards(LocalAuthGuard)
@Post('auth/login')
async login(@Request() req) {
return this.authService.login(req.user);
}
@UseGuards(JwtAuthGuard)
@Get('profile')
getProfile(@Request() req) {
return req.user;
}
}
TypeScript
복사
이는 strategy 패턴으로 구현되어 쉽게 커스터마이즈하고 있다는 장점이 있었습니다. 하지만 이것은 단점으로도 작용하였는데, passport의 동작 구조를 모른다면 새로운 부원들이 왔을 때, 라이브러리의 동작방식이 블랙 박스처럼 보인다는 것입니다. 이에 저희는 passport를 쓰지 않고 직접 구현하고 있었습니다.
이러한 모든 요구사항을 만족하기 위해 저희는 APP_GUARD로 전역으로 등록하는 가드를 하나로만 가져가고, 그 안에 모든 기능을 구현하고 있었습니다. jwtService를 이용한 jwt 인증 구성부터 Dev 환경인 경우 sid를 이용해 jwt 인증이 실패하면 한 번 더 인증을 try하는 로직, public api의 경우 인증하지 않고 넘어가는 로직까지 담겨있었습니다.
Task
이에 전역 가드 하나를 분리해내야했습니다. 따라서 다음과 같은 요구 사항을 만족해야했습니다.
•
복잡한 AuthGuard를 여러 개로 나누되, DI를 위해 하나의 전역 AuthGuard로 유지하기
•
환경에 따라 동적으로 인증 환경을 구성하기
•
순서를 한 곳에서 선언적으로 지정할 수 있게 하기
Action
작업물은 다음 PR에서 참고하실 수 있습니다.
돌이켜보면 이러한 요구사항을 담은 프레임워크를 이미 보았습니다. 바로 Spring Security 인데요.
Spring Security는 다음처럼 환경에 따라 다른 인증 Chain을 구성할 수 있었습니다.
@Profile("local")
@EnableWebSecurity
public static class SecurityLocalConfig {
@Bean
public WebSecurityCustomizer configure() {
return (web) -> web.ignoring().mvcMatchers(
"/",
"/swagger-ui.html",
"/v3/api-docs",
"/v3/api-docs/**",
"/swagger-ui/**"
);
}
@Bean
public SecurityFilterChain filterChain(HttpSecurity http) throws Exception {
return defaultAuthentication()
.andThen(oAuthAndJwtAuthentication())
.andThen(headerMockingAuthentication())
.andThen(exceptionHandler())
.andThen(permitAllList())
.andThen(defaultAuthorization())
.apply(http);
}
}
TypeScript
복사
이것이 가능한 이유는 Spring Security는 본인들이 사용하는 Filter Chain이 ServletFilterChain과 분리되어있기 때문입니다.
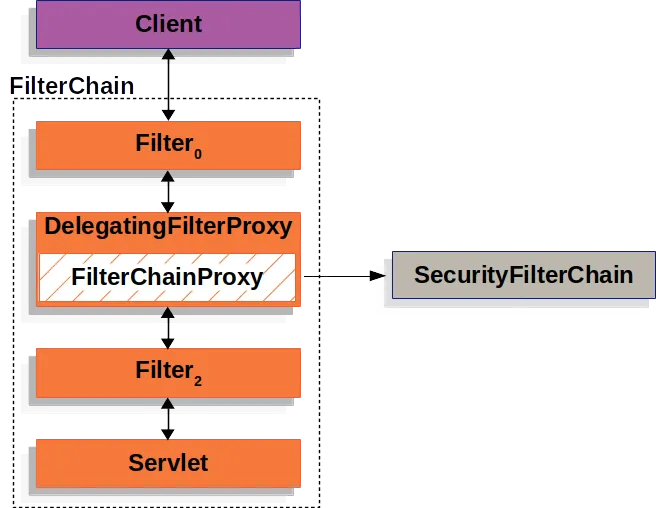
위와 같이 ServletFilter Chain에 등록되어있는 것이 아닌, SecurityFilterChain을 따로 구성합니다.
이에 동적으로 환경에 맞게 다른 SecurityFilterChain을 구성할 수 있는 것입니다.
이 지점에 착안하여 저 또한 아래와 같은 세 가지 인터페이스,클래스를 만들었습니다.
•
AuthChain
import {
ExecutionContext, ForbiddenException, Injectable, UnauthorizedException,
} from '@nestjs/common'
import { AuthCommand, AuthResult } from './auth.command'
@Injectable()
export class AuthChain {
private authChain: AuthCommand[]
constructor() {
this.authChain = []
}
public register(command: AuthCommand) {
this.authChain.push(command)
return this
}
public async execute(context: ExecutionContext) {
let result = {
authorization: false,
authentication: false,
isPublic: false,
}
for (const command of this.authChain) {
result = await command.next(context, result)
}
return this.handleException(result)
}
private async handleException(result: AuthResult) {
if (result.isPublic) return true
if (!result.authentication) throw new UnauthorizedException()
if (!result.authorization) throw new ForbiddenException()
return true
}
}
TypeScript
복사
해당 클래스는 NestJS에서 Injectable로 등록됩니다. 이 클래스가 하는 일은 execute 함수가 호출되면 그저 자신이 가지고 있는 AuthCommand를 순회하면서 결과를 받고 다시 그 결과를 다음 Command에 넣어주는 것입니다. 그렇다면 Command는 무엇일까요?
•
AuthCommand
AuthCommand는 인터페이스입니다. 실제적으로 인증을 처리하는 주체입니다.
import { ExecutionContext } from '@nestjs/common'
export interface AuthResult {
authentication: boolean
authorization: boolean
isPublic: boolean
}
export interface AuthCommand {
next(context: ExecutionContext, prevResult: AuthResult): Promise<AuthResult>
}
TypeScript
복사
AuthCommand를 상속하는 클래스는 next 함수를 구성해야합니다. 이 때 next 함수에서 실제로 인증이 일어납니다. 실제 구현체인 jwt.cookie.command.ts를 보게 되면 다음과 같습니다.
코드
이제 여러 개의 기능이 섞여있던 하나의 guard는 사라지고, 각자의 역할과 책임만을 가지고 있는 여러 개의 인증 모듈로 나뉘어질 수 있었습니다. 또한 하나의 Chain은 같은 ExecutionContext를 공유합니다. executionContext를 외부에서 주입받으니, Controller에 Decorator로 등록되어있는 정보에도 접근도 가능합니다
이제 이런 command를 chain에 등록하는 것은 누가 할까요? 바로 authconfig에서 진행합니다.
•
AuthConfig
AuthConfig는 다음처럼 환경에 따라 다른 Chain을 구성할 수 있습니다. 심지어 이것 또한 Injectable로 등록되어 복잡한 command들이 필요로 하는 요소들을 직접 주입해줄 필요도 없어졌죠.
import { Injectable } from '@nestjs/common'
import { IsReviewProhibitedCommand } from '@otl/server-nest/modules/auth/command/isReviewProhibited.command'
import { JwtHeaderCommand } from '@otl/server-nest/modules/auth/command/jwt.header.command'
import { SidHeaderCommand } from '@otl/server-nest/modules/auth/command/sid.header.command'
import { StudentIdHeaderCommand } from '@otl/server-nest/modules/auth/command/studentId.header.command'
import { AuthChain } from './auth.chain'
import { IsPublicCommand } from './command/isPublic.command'
import { JwtCookieCommand } from './command/jwt.cookie.command'
import { SidCookieCommand } from './command/sid.cookie.command'
import { SyncApiKeyCommand } from './command/syncApiKey.command'
@Injectable()
export class AuthConfig {
constructor(
private authChain: AuthChain,
private readonly jwtCookieCommand: JwtCookieCommand,
private readonly sidCookieCommand: SidCookieCommand,
private readonly jwtHeaderCommand: JwtHeaderCommand,
private readonly sidHeaderCommand: SidHeaderCommand,
private readonly studentHeaderCommand: StudentIdHeaderCommand,
private readonly isPublicCommand: IsPublicCommand,
private readonly syncApiKeyCommand: SyncApiKeyCommand,
private readonly isReviewProhibitedCommand: IsReviewProhibitedCommand,
) {}
public async config(env: string) {
if (env === 'local') return this.getLocalGuardConfig()
if (env === 'dev') return this.getDevGuardConfig()
if (env === 'prod') return this.getProdGuardConfig()
return this.getProdGuardConfig()
}
private getLocalGuardConfig = () => this.authChain
.register(this.isPublicCommand)
.register(this.studentHeaderCommand)
.register(this.jwtHeaderCommand)
.register(this.sidHeaderCommand)
.register(this.sidCookieCommand)
.register(this.jwtCookieCommand)
.register(this.syncApiKeyCommand)
.register(this.isReviewProhibitedCommand)
private getDevGuardConfig = () => this.authChain
.register(this.isPublicCommand)
.register(this.studentHeaderCommand)
.register(this.jwtHeaderCommand)
.register(this.sidHeaderCommand)
.register(this.sidCookieCommand)
.register(this.jwtCookieCommand)
.register(this.syncApiKeyCommand)
.register(this.isReviewProhibitedCommand)
private getProdGuardConfig = () => this.authChain
.register(this.jwtHeaderCommand)
.register(this.jwtCookieCommand)
.register(this.isPublicCommand)
.register(this.syncApiKeyCommand)
.register(this.isReviewProhibitedCommand)
}
TypeScript
복사
•
AuthGuard
그럼 최종적으로 Chain을 실행시키는 것은 누구일까요? 바로 AuthGuard 입니다.
import { CanActivate, ExecutionContext } from '@nestjs/common'
import { AuthChain } from '../auth.chain'
export class AuthGuard implements CanActivate {
constructor(private readonly authChain: AuthChain) {}
async canActivate(context: ExecutionContext) {
return this.authChain.execute(context)
}
}
TypeScript
복사
이렇게 AuthGuard는 전역 가드로써 Chain에 executionContext를 넘기고 역할을 위임하기만 합니다. Spring Security에서 DelegatingProxy와 역할이 같죠.
또한 AuthGuard는 AppModule에서 전역으로 등록되는데요. AuthGuard는 AuthChain을 주입받아야 동작합니다. AuthChain은 AuthConfig에서 환경에 따라 다르게 구성되고요. 따라서 AppModule에서 AuthGuard는 다음처럼 useFactory를 이용하여 런타임에 주입됩니다.
providers: [
{
provide: APP_GUARD,
useFactory: async (authConfig: AuthConfig) => {
const env = process.env.NODE_ENV === undefined ? 'prod' : process.env.NODE_ENV
const authChain = await authConfig.config(env)
return new AuthGuard(authChain)
},
inject: [AuthConfig],
},
{
provide: APP_INTERCEPTOR,
useClass: LoggingInterceptor,
},
JwtCookieGuard,
MockAuthGuard,
AppService,
JwtService,
],
})
export class AppModule {}
TypeScript
복사
이 때 AuthGuard에 넘겨지는 authChain은 Injectable로 등록되는 그 Chain입니다. AuthChain 클래스는 내부적으로 빈 chain으로 시작했다가, 런타임에 AuthConfig에 의해 채워지기 때문입니다.
Result
이를 통해 다양한 형태의 인증 체인을 구성할 수 있게 되었습니다. 단점이 하나 있었는데요. 바로 이전 command의 authResult를 넘겨받기 때문에, Chain 내의 특정 command가 인증/인가를 통과시켜버리면 모든 chain에 걸려있는 인증 command를 패스한다는 것입니다. 물론 이것은 command의 구현에 따라 막을 수 있는 것이지만, SpringSecurity에 있는 구현처럼 Voter를 따로 만들 수 없다는 것은 아쉬운 점입니다.
저희는 이를 통해서 위처럼 local,dev,prod 환경의 인증 체인을 다르게 구성할 수 있었습니다. 특히 새로운 인증 체계로의 전환(eg. 쿠키 → Header)을 할 때는 dev에 먼저 구성한 후 prod 배포를 하거나, 앱 하위호환성을 맞추기 위해 둘 다 유지하는 것이 편리해졌습니다. 이는 모두 역할/책임을 command라는 형식 안에 닫아놓았기 때문입니다.
또한 OTL 웹/앱 이외에 스팍스 내 다른 서비스(eg. sparcs one app)에서 보내주는 정보로 인증도 가능해졌습니다. 토큰을 이용하기 때문에 OTL에서 token에 담는 정보와 다르더라도 서로 약속만 되어있다면 복잡한 코드 변경 없이 인증을 구성할 수 있었습니다.
비즈니스 관점으로는 CS 대응에 용이해졌습니다. 문의를 준 사람으로 Dev 환경에서 문제를 재현해볼 수 있기 때문입니다.
sequenceDiagram
  participant User
  participant AuthGuard
  participant AuthChain
  participant Cmd1 as AuthCommand1
  participant Cmd2 as AuthCommand2
  participant CmdN as AuthCommandN

  User->>AuthGuard: HTTP Request
  AuthGuard->>AuthChain: execute(context)
  AuthChain->>Cmd1: next(context, result)
  Cmd1-->>AuthChain: AuthResult
  AuthChain->>Cmd2: next(context, result)
  Cmd2-->>AuthChain: AuthResult
  AuthChain->>CmdN: next(context, result)
  CmdN-->>AuthChain: Final AuthResult
  AuthChain-->>AuthGuard: true / false
  AuthGuard-->>User: Allow or Deny
Mermaid
복사